MailChimp Introduces MailChimp Pro
Grow your business and optimize your email marketing for only $199 a month. Improve your performance with powerful analytics tools built for growing companies.
Features
- Send your best email
- Discover customer insights
- Track delivery in real time
- Minimize sender’s remorse
- Take control of delivery
- Get fast, expert help
For more info and to watch the video: See MailChimp’s website
Mediation Firm Website
Ogawa Design Agency created a new modern logo, graphics, and custom images for Miami Mediation firm, Center for Conflict Resolution. We created a custom design using the latest open source development platform.
Google Plus Circles Privacy Settings
The great thing about Google Plus now is that very few users are hiding their Google Plus Circles. This is allowing the number of G+ users to quickly expand their list of friends in their Circles. Today, I stumbled on a user that had completely disabled the viewing of people In His Circles and that have Him in his Circles. Here is information on the Circles Privacy Setting.
How to Hide Your Google Plus Circles
1. From your G+ User Name, click Privacy
2. Under Sharing, click Edit network visibility.
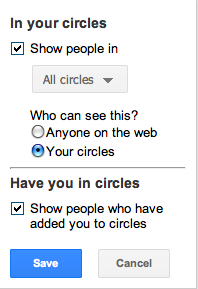
3. Under In your circles, the following box will appear.
Google Plus Circles Default Privacy Settings
- The default settings allows your friends to see people in all of your Circles. This may eventually not be what you want. However, it does not allow everyone on the web to see who is in your Circles.
Google Plus Circles Recommended Privacy Setting
- Under In your circles, select the All circles dropdown and uncheck any Circle of people you want to keep others from viewing. This could include Clients, Vendors or Special Friends (you get the idea). I noticed some celebrities are starting to uncheck this option to hide the People in their Circles.
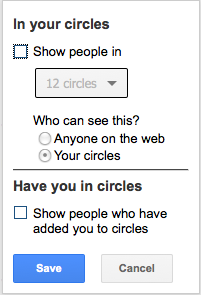
Google Plus Circles – Highest Privacy Setting
- Uncheck all boxes if you want the Highest Privacy Settings. Unfortunately, with this setting, you won’t have many friends until the Google Plus Network grows.
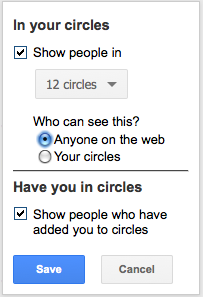
Google Plus Circles – Least Private Setting
- Under In your circles, Who can see this?, the Anyone on the web makes your G+ Circle of Friends viewable to anyone. For Celebrities, this might add provide many Followers, but this might open you up to G+ Spammers and fake G+ Profiles. That said, this is how the default Twitter setting is. G+ is still too new to know all the consequences of this.
Google+ is Here! Beta Program is Live! – Installation Notes

Google+ just went to Beta and if you are the type of business that is an Early Adopter and wants to have the latest and the greatest, you should signup for Google+ (Google Plus or G+). Google+ might be categorized as Google’s competitive service to Facebook. It’s currently an Invite Only beta but unlike some Google Betas, existing Google+ users appear to have an unlimited number of invites.
Here are some observations:
Installation
- Google Profiles — It has been deprecated or phased out and will become your Google Plus, About Page.
- Google PicasaWeb — After you activate your Google+ Account, check the permissions on your Google PicasaWeb Albums. Any Photos that you might have uploaded without a private setting may have a default permission of visible and be seen by Google Plus users.
- Google +1 — After installing Google+ it entered some very random URLs under go Google Plus +1 tab (similar to the Facebook Likes feature). This algorithm was a complete dart throw and possibly could contain private data.
- Google +1 — Google is now displaying the 1+ button on their search engine results and the idea is that websites suggested by your friends are more relevant.
- Google+ Hangout — You can open a Video Chat Window after installing the Plugin and chat with your friends (don’t forget to turn it off!).
- Google+ Notifications — The default setting is to email you any time there is any activity on your Google+ Account. This would includes Posts, Photos and Huddle (Conversations). You can disable these notifications: Google+ Settings.
- Connected Accounts — By default my LinkedIn, Twitter and Yelp Accounts were enabled. Facebook was not. After connecting this accounts, my postings appeared under the Google+ Profiles Page, Buzz tab.
Adding Friends
- Invites – You must send a separate invite from the G+ Home Page. The G+ Invite button is on the bottom right hand side of the page. You can add a Friend to your Circles or Groups, but that will not automatically send them a G+ Invite.
- Circles – Your Circles contains of list of Google Mail or Gmail Accounts and other Google+ Users. If a picture exists, then it is likely the user has an active G+ account. You can add friends to a Circle, even if they don’t have an active G+ account.
- Following Circle – You can search for and find Individuals and Celebs using the G+ Search Box much like Facebook and Twitter.
Google Plus Extensions
- Twitter – There is a Google+ Twitter client that adds another tab to the Google+ or G+ interface. I installed Google+ Tweet — unfortunately, it is very slow. It works with the Google Chrome Browser as a Chrome Extension.
- Google+Facebook Extension — This Google Chome Browser Extension from Crossrider adds a Tab in Google+ with your Facebook Wall, although after I installed it, the Twitter Tab disappeared.
Impact on Businesses
- Google +1 Button Code — Here’s the link with the code to add a Google +1 button to your website or blog. Once you add this button to your site, a list of the links will appear in your Google+ Profile Page, +1’s tab. Businesses should add the Google +1 button to their sites!
- Google Plus for Businesses — This could be a future product. In the interim, you should not create a Business Account for G+. It is for individuals only.
If you are interested in a Google + Invite, please let me know.
Ogawa Design Agency becomes a BigCommerce.com Reseller
Using Google Apps Standard Edition – It's free and very reliable!
Note: As of December 6, 2012, Google Apps Standard Edition has been deprecated or is no longer free. That said, Google Apps for Business it’s still a much more cost efficient solution that competitive cloud-based Email Platforms and legacy Microsoft Exchange Hosted Servers. Call us at 786-220-1295 for a free quote on converting to Google Apps for Business.
Company Email for your business should be easy to setup and configure for new and existing employees, especially for mobile devices and employees working from home without requiring a large cost to support.
Google Apps Standard Edition
That said, the most important thing is that it should be reliable. Google Apps Standard Edition meets both of those needs because there are no licensing fees and the only costs incurred are for support.
Here is a summary of Google Standard Edition features and some tips on setting it up for your company.
* User Accounts: You can setup 50 user accounts or 50 email addresses with the Google Apps Standard Edition.
* Nick Names: The 50 email addresses does not include Nick Names or email alias for each user. For example a user can have firstname@domain.com, firstname.lastname@domain.com etc.
* Email Forwarding: A user can forward a copy of the Google Apps or company email address to another address using the Google Apps email interface which is the same as the Gmail interface.
* Email Storage: You get 7.3 GB of email storage per account.
* POP / IMAP Mail Protocols: Both Pop Download and IMAP email protocols are supported. (The default is off so you will need to turn them on.)
* Web Access: With Google Apps Standard Edition, you have Web access to your company email at http://mail.google.com/a/companydomain or http://mail.companydomain.com (you will need to add a CNAME record for this to work).
* Spam: If your current company email contains many spam messages, Google Apps Standard Edition uses the same high-quality spam filters as Google Gmail. You will notice a significant decline in the number of spam emails received. In addition, you can setup the Positini Spam Application for greater control.
* Mail Client: The Google Apps Setup Guide contains excellent documentation for setting up Microsoft Outlook 2003, 2007, Mozilla Thunderbird, Outlook Express, Apple Mail and other clients for both IMAP and POP Support.
* Support: The Google Apps Setup Guide is an excellent piece of documentation.
* Mobile Devices: The Google Apps Setup Guide contains excellent documentation for setting up a Blackberry, iPhone, Windows Mobile, Android and other devices.
* Mail Service Setup: The initial mail server setup requires two major steps: 1) Adding a Google Validation HTML file to the root directory of your server, the same process required by Google Analytics 2) Pointing your MX Record to Google. There is an extensive list of specific MX record records.
For more information:
https://www.ogawadesign.com/services/concierge-webmaster/google-apps-standard-edition
Google Standard Edition Sign-Up (Free Edition)
http://www.google.com/apps/intl/en/group/index.html
Facebook Album Privacy Settings – How to
Every Facebook user who posts family or personal pictures to their Facebook Album should consider setting up their Facebook Album Privacy. This would be especially important if you don’t want some of your children’s pictures to be displayed to the entire Facebook community or your Facebook Network. Here are some recommended steps.
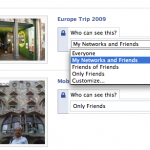
Step 2 - Facebook Album Privacy Settings . settings. Here are instructions for doing so.
- Step 1 – Assign each Facebook friend to a Facebook Friends List. From the Facebook main menu, click Friends, All Friends. I then created the following lists: a) Family, b) Close Friends, c) High School, d) College e) Family f) Business. The Limited Profile is automatically created for you. I only had a couple hundred friends but in my case, it took less than 15 minutes. You should note that your friends can belong to more than one list such as College and Close Friend. You should also note that Facebook considers everyone not in your Network a Friend.
- Step 2 – Go to your Facebook Privacy Photos. From the Facebook Home page, click Profile, then in the left Navigation under Photos, click See All. Under Your Photos, click Album Privacy. You can also go directly to this page by going to: http://www.facebook.com/privacy/?view=photos For each album, you will need to to select Who can see each album. The default settings are: a) Everyone b) My Network and Friends c) Friends of Friends and d) Only Friends.
- Sep 3 – For each Album you want to make private, click Edit Custom Settings. Then under Edit Photo Album Privacy, click Some Friends. If you click the + icon, you will see your the lists you created in Step 1 Above: a) Family b) Close Friends c) High School d) College e) Family f) Business. Select one or more for each album or to keep your Album Public, select Everyone, My Network and Friends, Friends of Friends or Only Friends.
- Step 4 – Test Your Settings – You will need a second Facebook account to test your settings. If you have a son or a daughter on Facebook that you have access to, then that would be a good account to use. Also, if you don’t have access to your son or daughter’s Facebook account and they are under age, this would be an excellent time to ask them for access rights. You can also use this opportunity to help them make the Album secure.
- Step 5 – Test Your Wall – From the Facebook main menu, Click Profile and make sure with your test account you correctly test your Wall to see if your privacy photo album correctly displayed. You should also click on the Photos tab and scroll to your list of Albums and see if they are correctly displayed. If you make a Family Album Private for your Family List, the Album name will not be displayed to your other Friends.
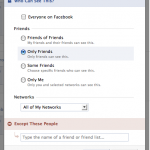
Facebook Edit Album Privacy settings - Some Friends
The process of setting your Facebook Albums using this method make take more than a few minutes, but it is well worth the time! You will also be able to keep selected Albums Public which may be important to your business.
Get your Facebook Username on Sat June 13, 2009 at 12:01 a.m. ET
If you have a Facebook account and you have a common name such as John Smith and you want the website address http://www.facebook.com/johnsmith for your profile rather than http://www.facebook.com/john.smith or jsmith or jsmith99999, then at 11:59 p.m. on Friday, June 12, 2009 you need to log on to Faceboook.com and grab your profile name. Yes, it’s on a first-come, first-serve basis just like you are buying online tickets to a concert or a sporting event! See the info below from Facebook.com.
Good luck!
From Facebook.com
Starting at 12:01 a.m. EDT on Saturday, June 13, you’ll be able to choose a username on a first-come, first-serve basis for your profile and the Facebook Pages that you administer by visiting www.facebook.com/username/. You’ll also see a notice on your home page with instructions for obtaining your username at that time.
Google AdWords Success Story Video
Here’s a AdWords Success Story Video.


